NEW: Learning electronics? Ask your questions on the new Electronics Questions & Answers site hosted by CircuitLab.
Microcontroller Programming » How to trigger Thermal Printer?
|
May 01, 2015 by lnino 
|
Hey guys, I have a new project and Maybe you can help me to answer some questions. I have bought a thermal Printer from adafruit. https://learn.adafruit.com/mini-thermal-receipt-printer/overview On the datasheet is written that the Communication Works via TTL serial Connection. But what Library can I use for that? Is there a Lib on the nerdkit Website for that? Or can I use the UART Lib of Fleury? Is UART the Same as TTL? Because the samples and Thermo Lib of adafruit are written in Arduino, I think I have to convert the Thermo Lib from Arduino to GCC. Like I did the Last time with the Portexpander with I2C. Hope this Works again. For the Connection of the Thermo Printer I think I can use the Ports which the nerdkit programmer uses. This Must be the Ports for RDX and TDX of serial Connection. Of Course I Cannot use the bootloader any more. But no Problem, I use an ISP flasher with extra pcb. Maybe some of you have experiences with TTL connections or Maybe also TTL combined with this thermal printer? I think I have to do following steps: 1) Finding a TTL Lib for my nerdkit to Communicate with the thermal printer 2) Convert the thermal printer Lib of adafruit from Arduino to GCC. 3) Connect the Printer to the serial Pins which the nerdkit USB flasher uses 4) Write some main Code for a printer Test Maybe you can Tell me if I am in the right direction. |
|---|---|
|
May 01, 2015 by Rick_S 
|
TTL is just the level the UART is at VS standard RS232. The UART on the micro controller is TTL level so since the printer expects that then it should be a simple connection of connecting ground to the micro controller ground, TX on the micro to RX on the printer and RX on the micro to TX on the printer. The UART library that the nerdkit uses to communicate with your PC for projects like the LED Array or the Temperature sensor would most likely work. The manual for the printer lists all the print codes and escape sequences. But in it's simplest form, more than likely if you send it a string followed by an ASCII 13 and 10 (CR/LF) it would likely print it. (I'd have to read the manual to verify that, but that is how serial printers I've dealt with worked in the past. Rick |
|
May 01, 2015 by lnino
|
Hi Rick, thanks for the reply. Does this also work when I am not using the nerdkit bootloader? Because I think I have to tell the microcontroller on which ports he has to listen. When I look at this reduced code I can't see there or in the UART Lib any hint about the Pins for UART. If it's only working with the Nerdkti boatloader I can flash it of course. I don't use the nerdkit usb Serial cable any more because it is damaged. :-( Because of that I am flashing with my USBasp ISP and Flashing board. So I am playing most of the time with completely empty ATMega168 MCUs. greeting lnino |
|
May 03, 2015 by Rick_S
|
You don't need the Nerdkit USB/Uart cable, the printer will connect directly to the transmit/receive pins on the microcontroller that the cable connected to. Pin 2 on the microcontroller is the receive line at TTL level, Pin 3 is the Transmit line at TTL Level. You should be able to connect those two pins and the ground (Pin 8) to the 3 pin connector on your printer ( transmits to receives, ground to ground) and be able to print. From what I can tell, you will also need to set the baud rate to 19200 to communicate with the printer. The standard NK serial library communicates at 115200, so you will need to change the baud there. If you want to stay with the NK library, I would recommend copying their library to a new file changing that file and using it instead. You should also use a separate power supply for the printer - one capable of supplying the needed current for the thermal print heads. Unless you are really dedicated to the Nerdkit hardware setup, You might try investing in an arduino / arduino clone. They can be purchased for under $10US on ebay. It would definitely make this simpler for you since you could just use the pre-made demo software others have already developed. Rick |
|
May 03, 2015 by lnino
|
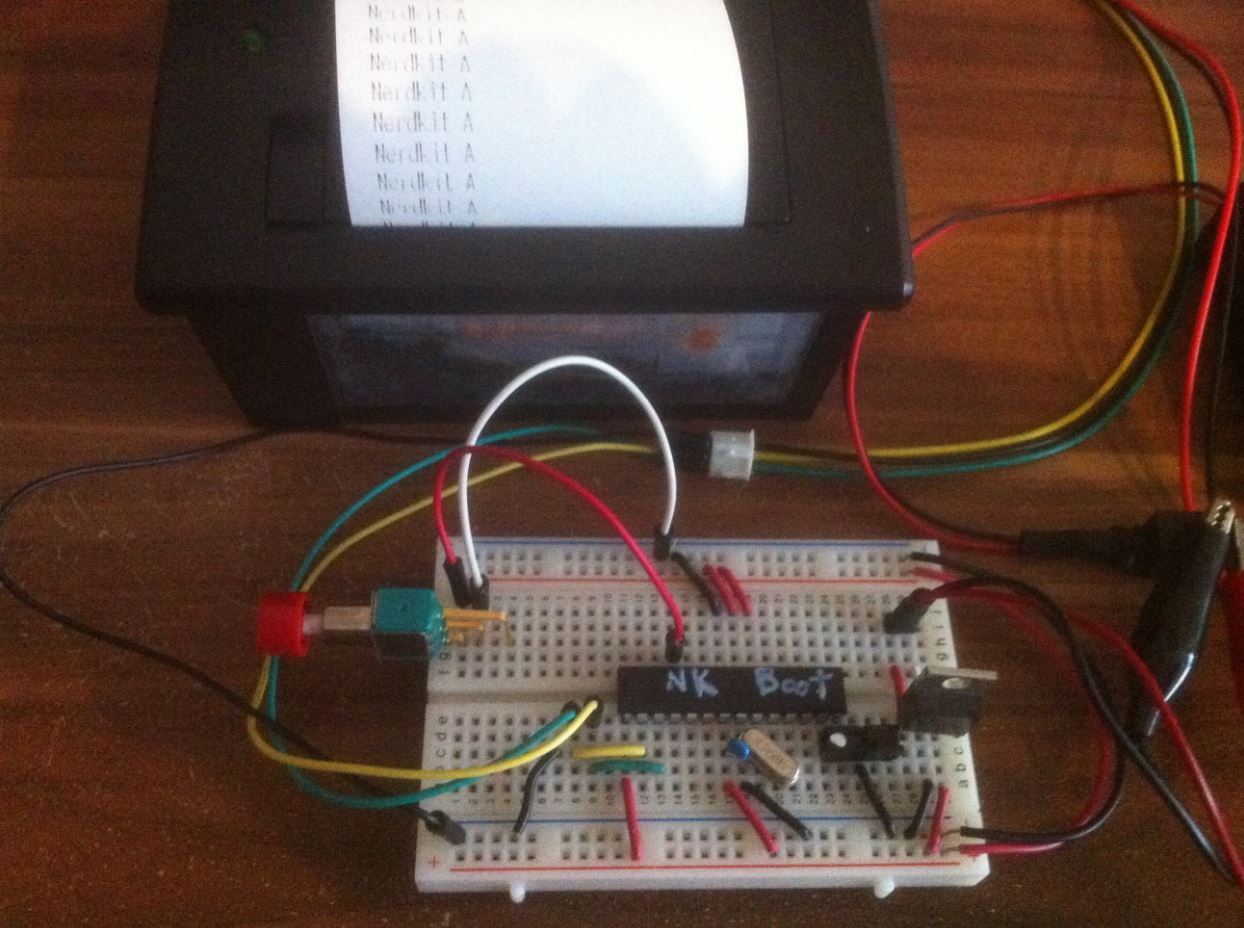
Hi Rick, thanks for your reply. That helped a lot. In most of my Projects I want to learn as much as possible. So most of the time I start from scratch with barebone. Buying an Arduino and using the finished Libs and code is of course much easier, but the learning aspect is in my view a Little bit lower. Nontheless, I have orderd the arduino UNO clone for 6 Euro from eBay. Playing around and saving some time in some projects sounds nice too. I have now modified the UART Lib and copied it to my personal libs. Now I can choose between often used BAUDRATES. If you like I can share the lib, but it's really simple. Now I am able to print with the thermal Printer via TTL. Really nice. I used two power supplies. 9V for the breadboard with 7805 to 5V. 9V for the thermal Printer straight Forward. The font is still not really thick and clear, but I think I can correct this with some Settings.
But how can I send this Messages or to be more specific in which Format? In the code where I send a string via UART I added /r and /n for "carridge return" and "line feed". This one seams Logical for me. It means please print and jump to the next line. But when I want to print the letters bold, the Manual of the Printer(see Picture below) tells to send "ESC E n" to the Printer. In Detail I think this will mean I send "27 69 1" for bold and "27 69 0" for normal. How shall I do this? I am a Little bid confused. Maybe you can tell me one example with my code to send this command, then I can do the rest by my own.
|
|
May 04, 2015 by lnino
|
I was able to figure out how to send the commands. But the printed text has still extremly low quality. I tried to use different settings for heat, dots, etc, but no change. Also different power supplies with different Ampere didn't make it better. Most times more worse. I think I have to test around, or maybe you have some experiences? Here you can see my Output with two different power supplies. And as I have read the 5V 2A power supplies is recommended for that Printer.
And here is the current code: |
|
May 05, 2015 by Rick_S
|
It looks to me like you may have a bad roll of thermal paper. It'd be a pretty cheap test to buy a new roll from your local office supply store and try it. If that doesn't do the trick, maybe contact SparkFun as you could have a defective print head. Rick |
|
May 06, 2015 by lnino
|
Hi Rick, thanks for your tip. I tried it yesterday with two different types of thermal paper. But I didn't got a better result. I think I have to talk with the vendor or seller. greetings Nino |
|
May 06, 2015 by Ralphxyz 
|
Hey I lnino, did you ever figure out how to get input with the port expander? We had output working (thanks a lot to Noter) but I never did get input. |
|
May 08, 2015 by lnino
|
@Rick: I was now able to figure out why the Quality of the Printer is that bad. I had a power supply on which was written 5V 2A. But maybe it was damaged or not good. I tried a "variable power supply" where I can choose Volt and Ampere manually. Then I set it to 5V and 2A and then the Printer Quality was great. @Ralph: I haven't tried it in the meantime. But now where I am doing more Projects with the microcontroller I think I will give it another try. I will let you know when there is some Progress in the Project. @All: Now I will continue with the Printer library. I have some Troubles when turning off f.i. bold, it continues printing bold, but I think the hex numbers are correct. But just in this Moment I have neither my Printer nor my code available, so I will post my Problem when I am back at home. |
|
May 08, 2015 by Rick_S
|
Glad you got it figured out, buggy power supplies can be a pain in the back side. |
|
May 08, 2015 by BobaMosfet 
|
Inino- I don't know if you've obtained an ASCII table already. If not, here is one that has most everything (including extended set): I looked at the command reference you showed above, and an exclamation point (!) is not a 69 decimal, it's a 33 (0x21). As for zero or 1, they either mean 0x00 or 0x01 for on and off, or they mean 0x30 (0) or 0x31 (1). Based on what you're doing, I'd try either one. BM |
|
May 08, 2015 by BobaMosfet
|
In case that link didn't work in the above message, here it is again, direct: http://www.ascii-code.com/ BM |
|
May 12, 2015 by lnino
|
Oh, that Looks like a typo in the Manual. I checked the rest and this seams okay. I will upload my current code of a test print of an invoice when I am at home. At my current code there are some extra letters and some are missing. |
|
May 12, 2015 by lnino
|
Now I will Show you my sourcecode. It should be very simple to read. I have to use two times the "L" function, or else the Printer Output would not be on the left side. I am also having the Problem, the Printer Output prints some extra letters and leaves some letters. But I have no clue, why this happens. I have checked the ASCI Codes of the align usage with the Hex Codes on the link you sent me and they seamed to be okay. Any ideas why the result Looks like that?
Source Code: |
|
May 12, 2015 by BobaMosfet
|
Inino- I'd slow your communications down to 9600bps. If that is reliable, then try 14.4Kbps. BM |
|
May 12, 2015 by lnino
|
The Printer has been delivered with a Baudrate set to "19200". I have to read the Manual if it's possible to change this. |
Please log in to post a reply.
|
Did you know that SPDT stands for "Single Pole, Double Throw"? Learn more...
|


Copyright © 2013 by NerdKits, L.L.C.